3.29.2013

Lily Bee Blog Hop

Hi there, Lily Bee fans! It's time for a blog hop to showcase the talents of our new design team!

6a014e86b0613b970d017ee41c06bc970d-800wi


Our blog hop continues with this week's theme of Spring / Easter projects!  I decided to create some Easter-inspired home decor for this hop...


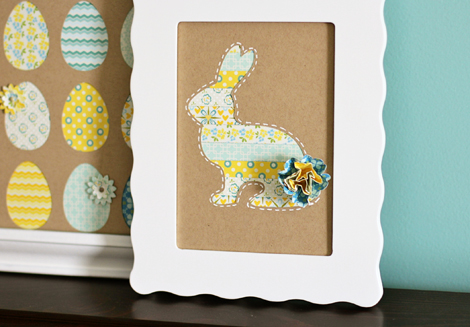
I have two frames (an 8x10 and a 5x7) that I like to use to showcase seasonal home decor around my home.  I love to use my paper crafting supplies to make simple, seasonal decorations that my family and I can enjoy!


For these framed art pieces, I cut out an egg and bunny design using my Silhouette Cameo.  I used the "negative" of the cutout designs and placed strips of paper from the Sweet Shoppe and Pinwheel collections behind them on a separate sheet of card stock.  It couldn't have been easier!  For the bunny's tail, I used a small scalloped punch and a small brad to add some dimension to the bunny silhouette.  I also took a white gel pen and added "stitches" all around the bunny shape for more of a handmade look.


I also used a small flower-shaped punch and some enamel dots to add a few flowers to some of the eggs in the larger frame.  I wanted to keep the design simple, but bright and colorful.


I'm so excited to be working with the following designers for the next year! They have created many inspirational projects using the new collections, so make sure you stop by each of their blogs to see their work and leave them some love and then head back over here for a chance to win some Lily Bee Design products of your own!

Adrienne Alvis <<<You are here.
Becky Williams
Christine Newman
Cindy Liebel
Diana Fisher
Diane Payne
Heather Leopard 
Leslie Ashe
Nicole Nowosad
Patricia Roebuck
Stacey Michaud
Summer Fullerton
Wendy Sue Anderson

  GIVEAWAY!
Sweet-Shoppe-Badge
We’re giving away a Sweet Shoppe paper pack!

  • Comment on the Lily Bee blog by midnight ET on 3/31/13, letting us know you completed the hop
  • FOLLOW the Lily Bee Design blog in the upper right hand corner of our blog
  • Like our Facebook page and share the blog hop link with your scrapbooking/cardmaking friends! Be sure to tag @LilyBeeDesign 
  • Bonus: Make sure you are on our Newsletter mailing list
Good luck and have a great weekend!

3.28.2013

Me & You

Happy Thursday, friends! 

I have a tutorial up at the Come On Get Crafty blog today!  I hope you'll check it out :)  It's all about layering...


Have a great day and TFL!

3.26.2013

Project Life - Week 12

Happy Tuesday, friends!  

I'm posting my Project Life Week 12 spread at the Come On Get Crafty blog today, so I hope you head on over and check it out :)

Here's a little sneak peek at Week 12...


To see the full post go here.  There's also information about an awesome giveaway!  

I hope you have a wonderful day!  TFL :)

3.25.2013

Puddle Jumper

Happy Monday, everyone!

It's been snowing here since yesterday afternoon which makes it really hard to get great spring photos of the kids playing outside!  I did have a few shots of Avery jumping in mud puddles from last year so I dug them up and put them on this layout that is up on the Lily Bee blog today...


For this layout, I used paper and embellishments from the Sweet Shoppe and Pinwheel collections.

Be sure to check out all the details about my layout here and see what Becky came up with for even more Easter and springtime inspiration!

Have a great day!  TFL :)

3.22.2013

Hello Sunshine Sneak Peek

Happy Friday!

I'm over at the She's So Crafty blog today with my first layout using some of Come On Get Crafty's awesome products!  I hope you get a chance to stop by and check it out :)

Here's a little sneaky peek...


Head on over here to see the full post!

I hope you have a great day and a fabulous weekend!  TFL!

3.20.2013

Picture Perfect

Happy Wednesday, everyone!  

I have another layout to share with you today that I created using some more modeling paste (you can check out my tutorial on how to do that here) and another exciting announcement!  I just joined Come On Get Crafty's Creative Team!  I'm so excited to be starting this new creative adventure with Nicole and her amazing online shop!  Be sure to stop by and check out all of her fabulous products :)  

Now on to today's layout...


I had this very recent photo of my family (all of us!) at my son's sixth birthday party last month that I couldn't wait to scrap, but it was one of those deals where I needed some inspiration and some direction.  When I received my March Studio Calico kits in the mail I was instantly inspired by the adorable "Picture Perfect" stamp set!  I added the "Not always" part with some itty bitty letter stickers because let's face it...nothing is perfect, even if it "seems" to be.  


My life is absolutely far from perfection (no matter how hard I try!) but when I'm with my loved ones, it is perfect.  Because we're perfect together, happy or sad, glad or mad...we're in it together and that's all that matters in the end :)


I used some more modeling paste ( I told you I was addicted :) and a star mask from SC.  I love adding a touch of color using my spray ink and I also added in a few enamel dots as well.


Oh, and Avery totally posed like that all on her own, lol!  That girl!

Have a great day and TFL!

3.19.2013

Tuesday's Tutorials - Using Modeling Paste on a Layout

Happy Tuesday, my friends!  

Today I have a tutorial for you on how to use modeling paste on a layout (or card, or anything else your creative little mind can come up with :)!  


First, you'll want to gather up some supplies...

I used one of my favorite masks from SC, some card stock, washi tape, a plastic knife, a small paint brush, some of my favorite mists, and some modeling paste (the exact kind I used is pictured below).  


Next, place your mask anywhere on your page that you would like.  Adhere it down using some washi tape.  The washi helps hold it in place and is easy to remove when your done.


Now smear some of that paste over your mask using the knife until it's completely covered and your satisfied.  (I should have used the side of the knife that wasn't serrated for a more even look and I'm sure there's a fancier tool for this, but I don't have it, lol!)

It should look somewhat like the photo below...


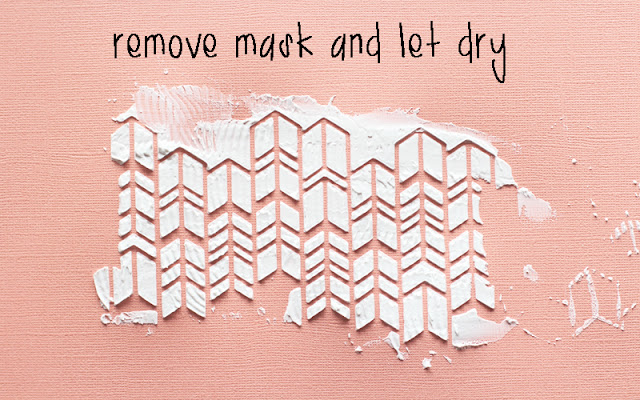
Now you can remove the mask and let the modeling paste dry.  I was surprised at how fast it actually does dry so you won't have to wait too long, probably around 20 - 30 minutes :)


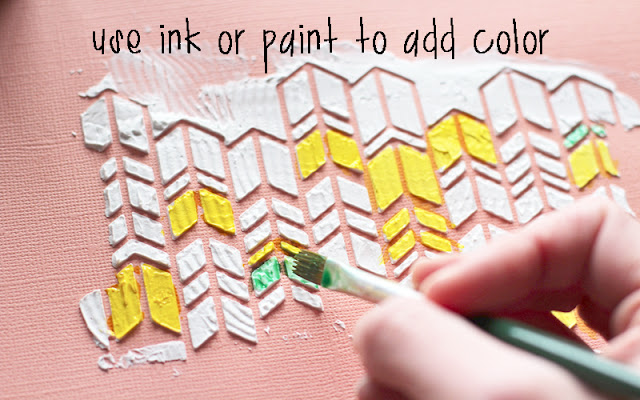
After the modeling paste dried, I took a small paint brush, dipped it in my Mister Huey's spray ink, and painted a few of the chevrons for added effect.  I love the pops of color it gives the dimension of the paste!


Finally, after the paint dries, you can start assembling your page!


And here's the completed layout using the modeling paste technique...


I've scrapped this photo of my family before, but I don't mind doing it again :)  It's a rare thing when we're all together in a photo, so it's totally justified!


I used products from my March kits from Studio Calico for this layout and a printable and stamp from LifeLovePaper.com


I hope this tutorial gets you breaking out the modeling paste and using it on your next project!  It's a really fun medium to use and once you try it, I know you'll be hooked!  I would also love to see what you create so be sure to link up your project using modeling paste here by April 2, 2013 for a chance to win some "happy mail" from me!

Have a great day and TFL!


3.18.2013

Project Life - Week 11

Happy Monday! 

I have my Project Life spread for Week 11 to share with you today...


I totally went with the St. Patrick's Day color scheme to commemorate the week...green and yellow!  


I used 3x4 and 4x6 PL cards from the Studio Calico March PL Kit, a few downloaded printable journaling cards from Hello Forever, and some yellow filler cards from my Digital Seafoam Project Life Kit from AC Digitals.  


I didn't take a ton of photos this week for various reasons and I had a couple of events that occurred  that I felt were too personal to share on here so I added a very small 4x6 insert to document those stories.   Some things aren't meant to be front and center and I like that I can add things in like this by using a smaller insert.


Our weather has been horrible!  One day it's 65 degrees and sunny and the next it's snowing, raining, and freezing cold!   I'm super sick of it and I just wish spring would hurry up a bit...and stay longer than a few hours!  I also forgot to take a screenshot of the week's forecast on my phone (first time that's happened this year!) so I made sure I added in a little shot of the snow we got on St. Patrick's Day.


I tucked a little journaling tag inside of the green envelope...just a few words about my kiddos playing on the bridge at grandma's house :)


The biggest events of the week were our dishwasher breaking down and I got to share my announcement of being a part of the LilyBee Creative Team, which I'm stoked about, btw!

And here's the full spread for Week 11....


 I hope you had a great Week 11 and a happy St. Patrick's Day!  TFL!


3.16.2013

Awesome

Happy Saturday!  

I have another layout from my recent spot as Stuck?! Sketches Guest Creative Team Member this month...


Here's the sketch...


And here's my take on it...


 I stuck pretty close to the original sketch, but I moved the title down a bit and to the left.


I had these photos of my youngest son holding his "pet" frog he found last spring.  He was so proud of himself for finding the frog and for having enough nerve to hold it in his hands!


Be sure to check out the Stuck?! Sketches Creative Team's take on this great sketch here and jumpstart your creativity for the weekend!

Have a great day!  TFL!!!

3.14.2013

Lily Bee Creative Team Announcement

Happy Thursday, friends! 

I have some exciting news to share with you today:)  I've been asked to be on the Lily Bee Creative Team!  I'm so excited and thrilled to be a part of this amazing group of designers!  

And here's the official announcement that's on the Lily Bee blog...

DT Announcement

The new team will be sharing their creations starting next week.

Make sure to follow this blog (click "Follow" in the upper right hand corner above Connect with Us), as well as FacebookInstagramTwitter and Pinterest. We offer unique promos/giveaways, sneak peeks and more on each of these social platforms!

You can also sign up for our e-newsletter, so you can be one of the first "In the Know", get the skinny on current challenges, tutorials, new products and more. Click HERE to sign up.

And of course, we want to thank our outgoing team members, Andrea BudjackDeanna MisnerMelissa MannMelissa Stinson, and Ursula Schneider. Your creative contributions and beautiful work has been soo inspiring! We will miss you tremendously!

Before you go, make sure to check out the Lily Bee Design challenges, posted in the upper left hand section of the blog. We'd love to have you play along with us each month!
Heather Blog Pic Main


Be sure to check out all the team members' blogs...these ladies are AhhhMAZING!  Congratulations to everyone! 

Have a great day!  


3.13.2013

Rad Dad

Happy Wednesday!  

I have a layout to share with you today...


I've had this photo of my daughter and my husband since last year and I decided it was finally time to scrap it!  Funny how that works sometimes...I'm usually very current with my scrapping, but sometimes a few pics slip through the cracks so to speak, ha! 


This was the first time I've ever tried using modeling paste on a layout and let me tell ya that I'm hooked!  It was so easy to use an I LOVE the dimension and texture it gave my page.  I was totally inspired by Mel Blackburn's layout that she created for Shanna's Sketches that I just knew I had to try it!  Hopefully, I'll have a little tutorial about using it on here next week :)


My husband is truly a kid at heart...he loves goofing off and teasing the kids any chance he can get.  He always finds little ways to brighten their day and tries to cheer them up when they are down.  Sometimes I don't give him enough credit, but I'm glad he has these characteristics because I'm usually way too serious about most things :)

I hope you're having a great day and be sure to stop by tomorrow for a big announcement!!!!!!!!!

xo

3.12.2013

Tuesday's Tutorials

Happy Tuesday, everyone!  

I'm very excited to share a special new feature on my blog with you today!  I have a layout and a tutorial!  I plan on posting tutorials (almost) every Tuesday!  They will be anything from super simple techniques that you can use on your layouts, cards, or Project Life spreads to step-by-step instructions for creating layouts, photography tips, and more!  I'm really excited about this new feature and if there is ANYTHING you would like to see, please don't hesitate to comment and let me know :)


I took these photos of my daughter a few days before she turned four years old.  She was actually getting her spring pictures taken at school that day so I thought it would be fun to "practice" a few poses beforehand...


I knew I wanted to have a lot of texture on this page and I had this idea of scrunching up paper in my mind for a while before I formulated exactly how I was going to achieve the look.


I took these photos in my bathroom where the light was shining in through the window absolutely perfect that day!  I also used the new iPhone app, PicTapGo, from Totally Rad to adjust the shadows and soften the shots.


I used paper and embellishments from the March Studio Calico kits +Add-ons for this layout.  I have to say that SC really knocked it out of the park with their kits this month.  Wow!  I immediately dove into my box the minute it was delivered and whipped out three layouts in one afternoon!  I honestly don't think that's ever happened before!


And here's how I achieved the textured look on my layout in a few simple steps: 

Misted Book Paper Scrunching Tutorial:


First, you need to gather your supplies and here's what you'll need:

1.)  A piece of book paper.  I used some I had leftover from a previous SC class.  You can scour garage sales or flea markets for cheap, old books.  I recommend using book paper because it's lightweight and it soaks up the spray ink well.

2.)  3 or 4 colors of spray ink/mists.  I use Mister Huey's, but any spray ink should do the trick.  For this project I chose a yellow, a light orange, and a darker orange to give it sort of an "ombre" effect.

3.)  Scissors or a paper trimmer.

4.)  An area where you can get messy with your inks.  I use my SC boxes to mist my projects in.  I'm all about the re-using of my SC boxes, lol!


Next, you'll need to cut your book paper into strips.  The strips can be as wide or as narrow as you like.  I used my Fiskars scissors to cut my page and I didn't care if the strips were straight, crooked, different sizes, etc.  It's all going to get smushed up anyway, so I wasn't being too particular.

***Don't cut all the way through your book paper.  Make sure you leave a little room at the top when you're cutting, about an inch, so that the strips don't all fall apart from each other.


Next is the fun part!  Mist that paper up good!  You can't mess it up, so have some fun and get creative!  I started with the lightest color (yellow) at the top and worked my way down.    


Now you'll want to turn your paper over and let it dry.  I didn't have to wait too long because as I said above, the book paper really absorbs the mist well and I like the effect that it leaves on the opposite side of the paper.


Next you can start scrunching.  This is also pretty fun, but don't get too crazy and rip it up, unless that's the look you're going for and in that case, GO FOR IT!  There's no right or wrong in creating as long as you're having fun with it!  I actually scrunched my paper before it was completely dry, but I was in a hurry and it works well either way (slightly wet or dry).


And finally, you're ready to add your scrunched up, smushed up, paper piece to your layout or card!  Like I said above, I really like the look of the reverse side after all of the misting, but it's up to you which side you use :)  I also added in extra strips of gold polka dot vellum from Dear Lizzy on my layout...I just stuck them in wherever I pleased amidst the other strips.  I really liked the effect of the extra vellum strips and I think it would be fun to add in other strips of patterned paper as well, or even ribbon and twine!  The possibilities are endless!

Well, I hope you enjoyed my little paper scrunching tutorial today and I hope you try it out on one of your creations!  In fact if you do try it out, I would love to see!  Link up your creation using the "paper scrunch method" in the comment section of this post by Tuesday, March 26th 2013 and I'll randomly draw a winner to receive some "happy mail" from me!

Good luck, happy scrunching, and have a great day!