4.27.2016

Enjoying Every Moment and a Project Life Card Tutorial *Hip Kit Club*

Hey everyone! 

I have a layout that I created using the April 2016 Hip Kit Club moodboard and the April 2016 Hip Kits to share with you today! 


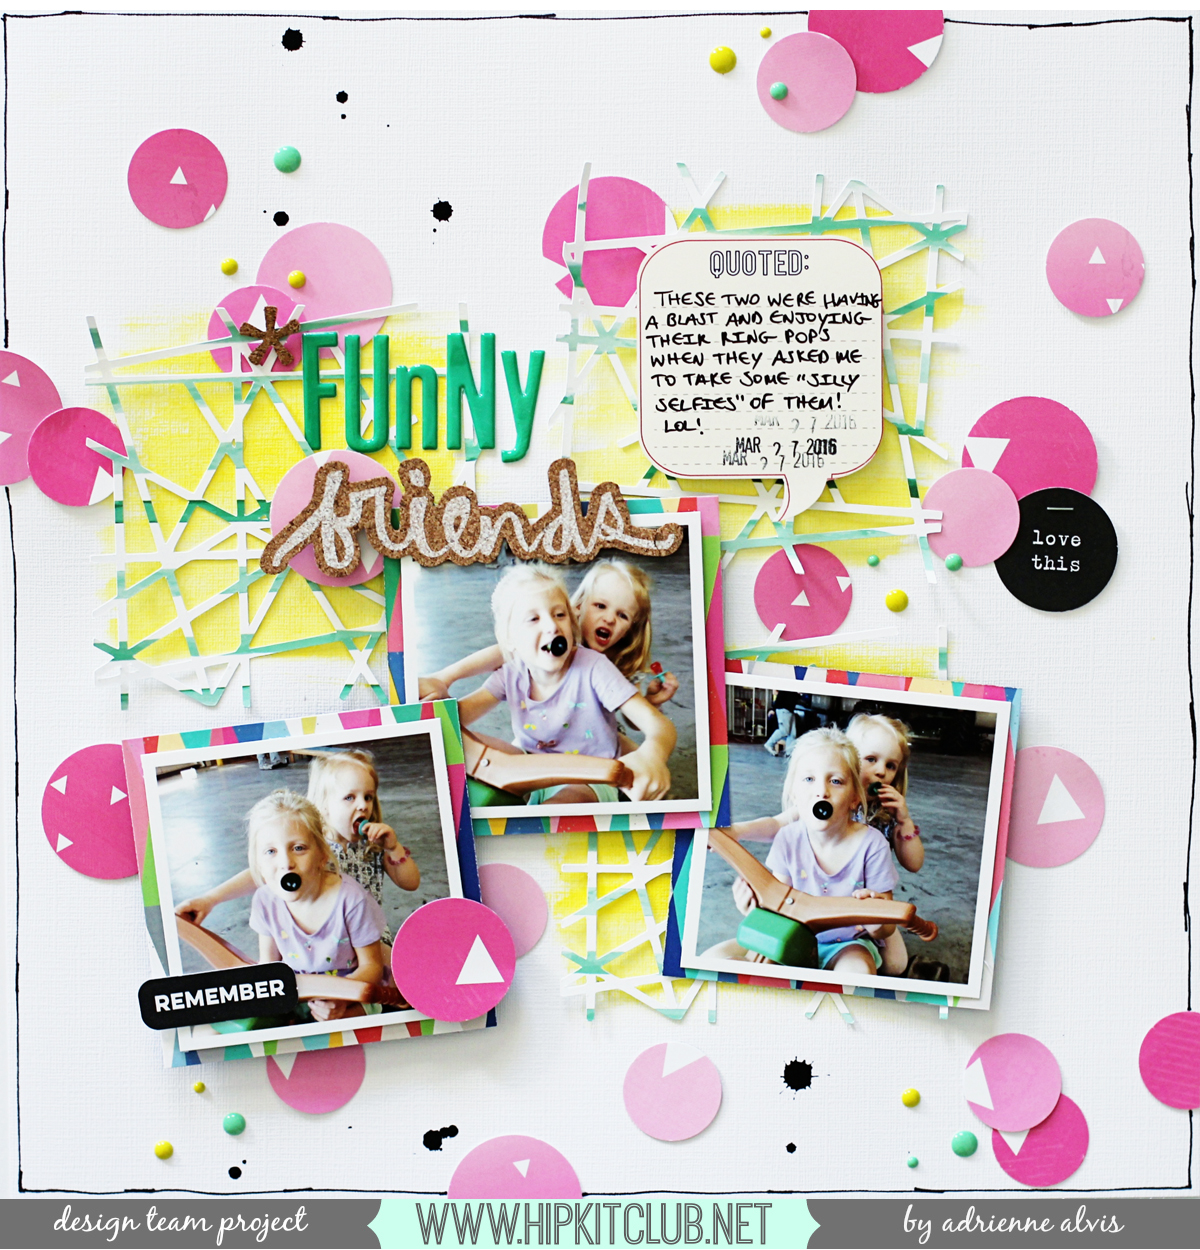
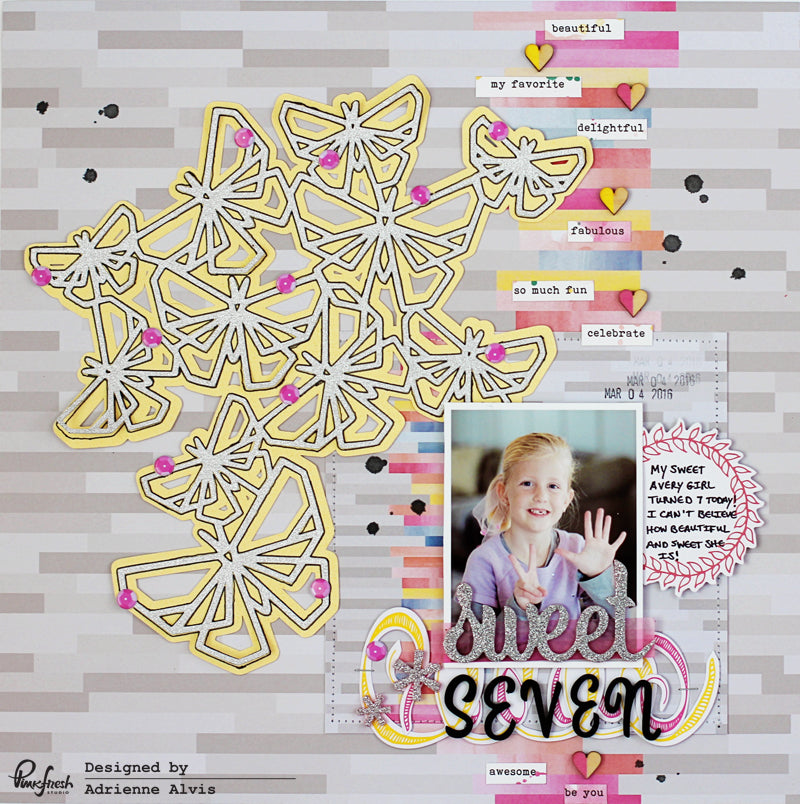
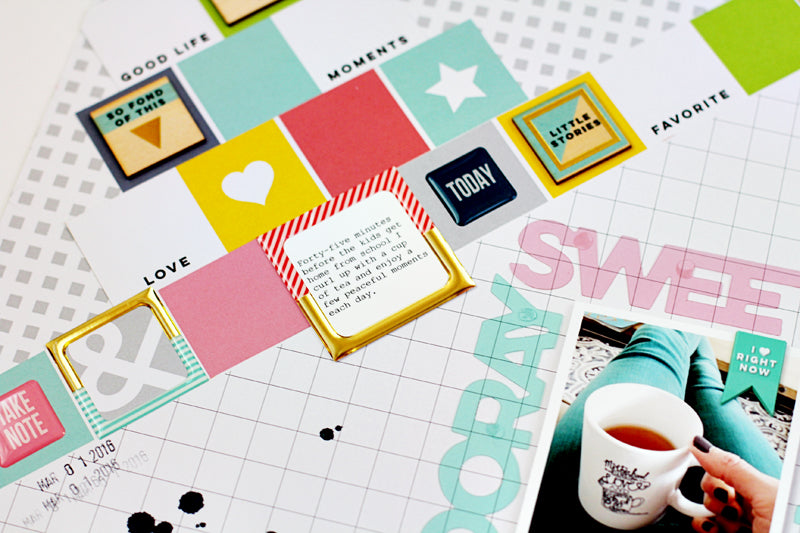
The happy hues from this layout came from all of the gorgeous color inspiration from the April 2016 moodboard...


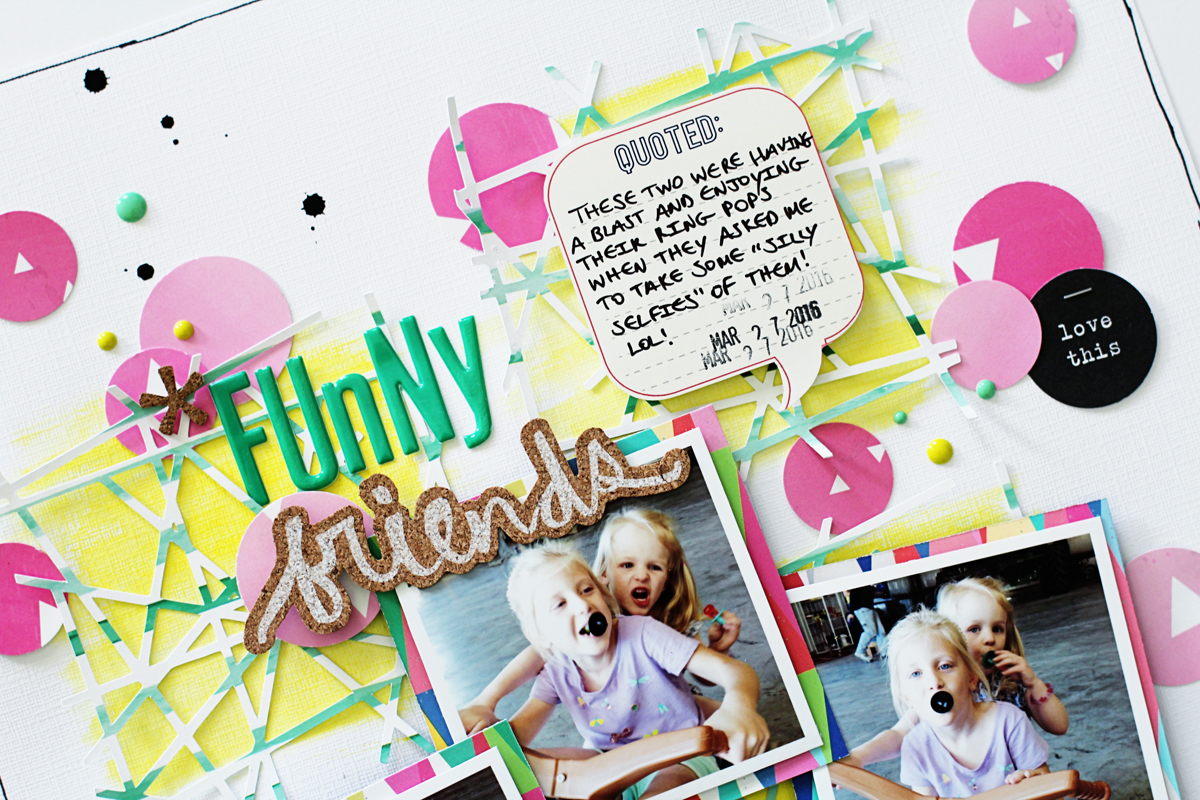
I used a yellow stamp marker to color in several of the sentiments on the Elle's Studio patterned paper and then layered a few embellishments from Shimelle and Pinkfresh Studio around the "Enjoying Every Moment" sentiment to create my title.


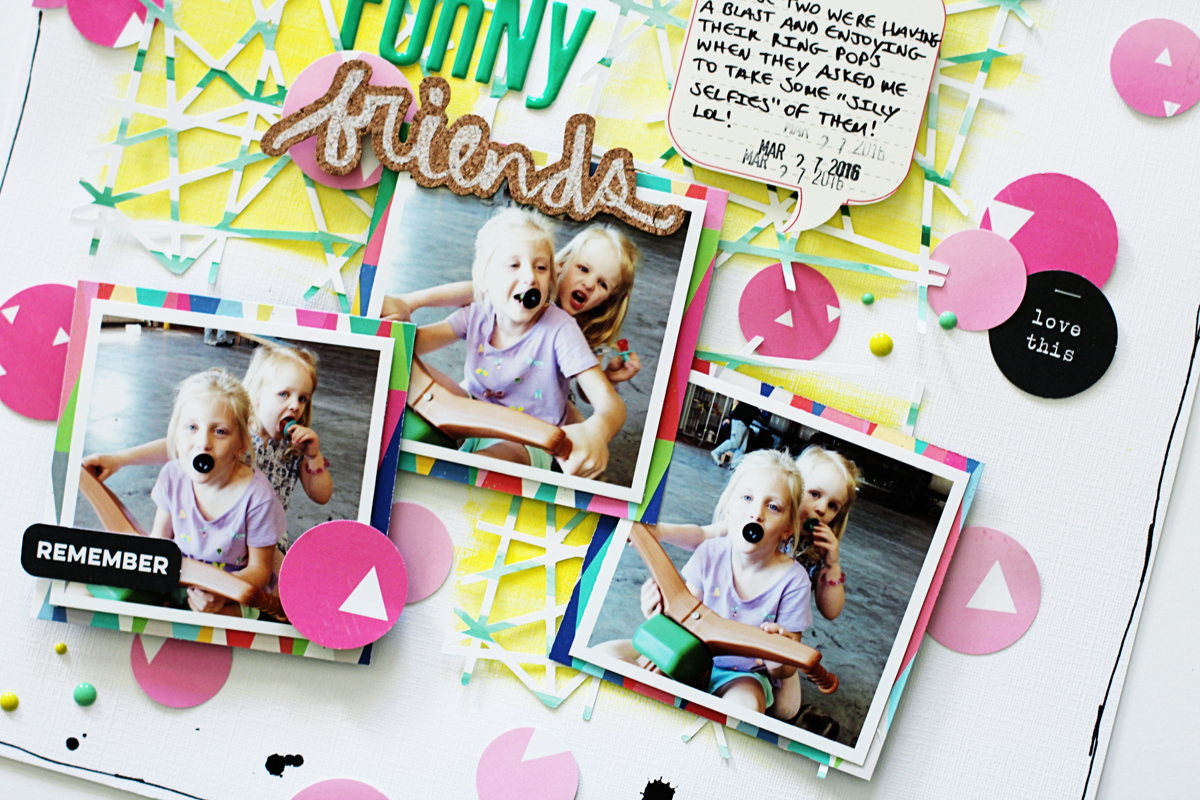
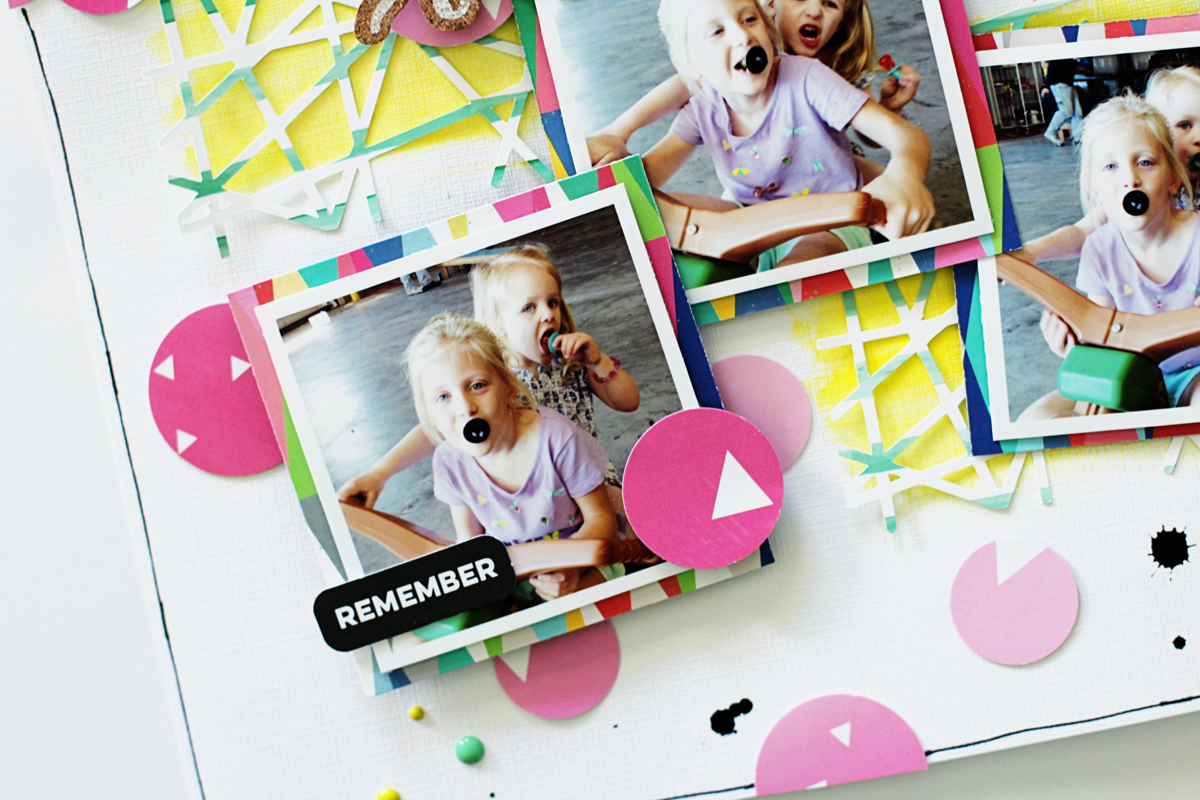
I placed the two photos of my daughter on top of a piece of the floral ampersand cut file created by Kim Watson and layered a few enamel dots around it to coordinate with the pops of coral and red from the moodboard. 


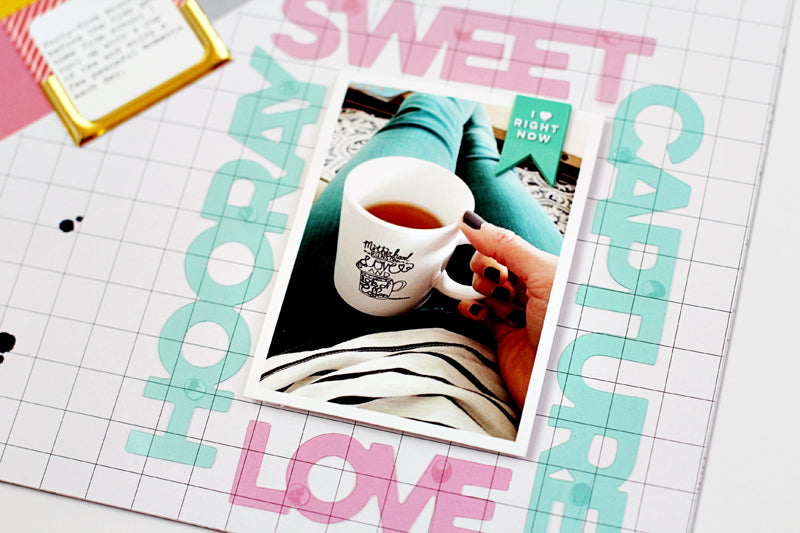
I used several of the acetate phrases from Pinkfresh Studio that are available in the April 2016 Main Kit  around the bottom half of my layout and added some other embellishments from the kits to create some depth and texture. 


I love how the colors pop off of my page and how well my daughter's shirt coordinates with the lovely striped patterned paper that is an HKC exclusive! 


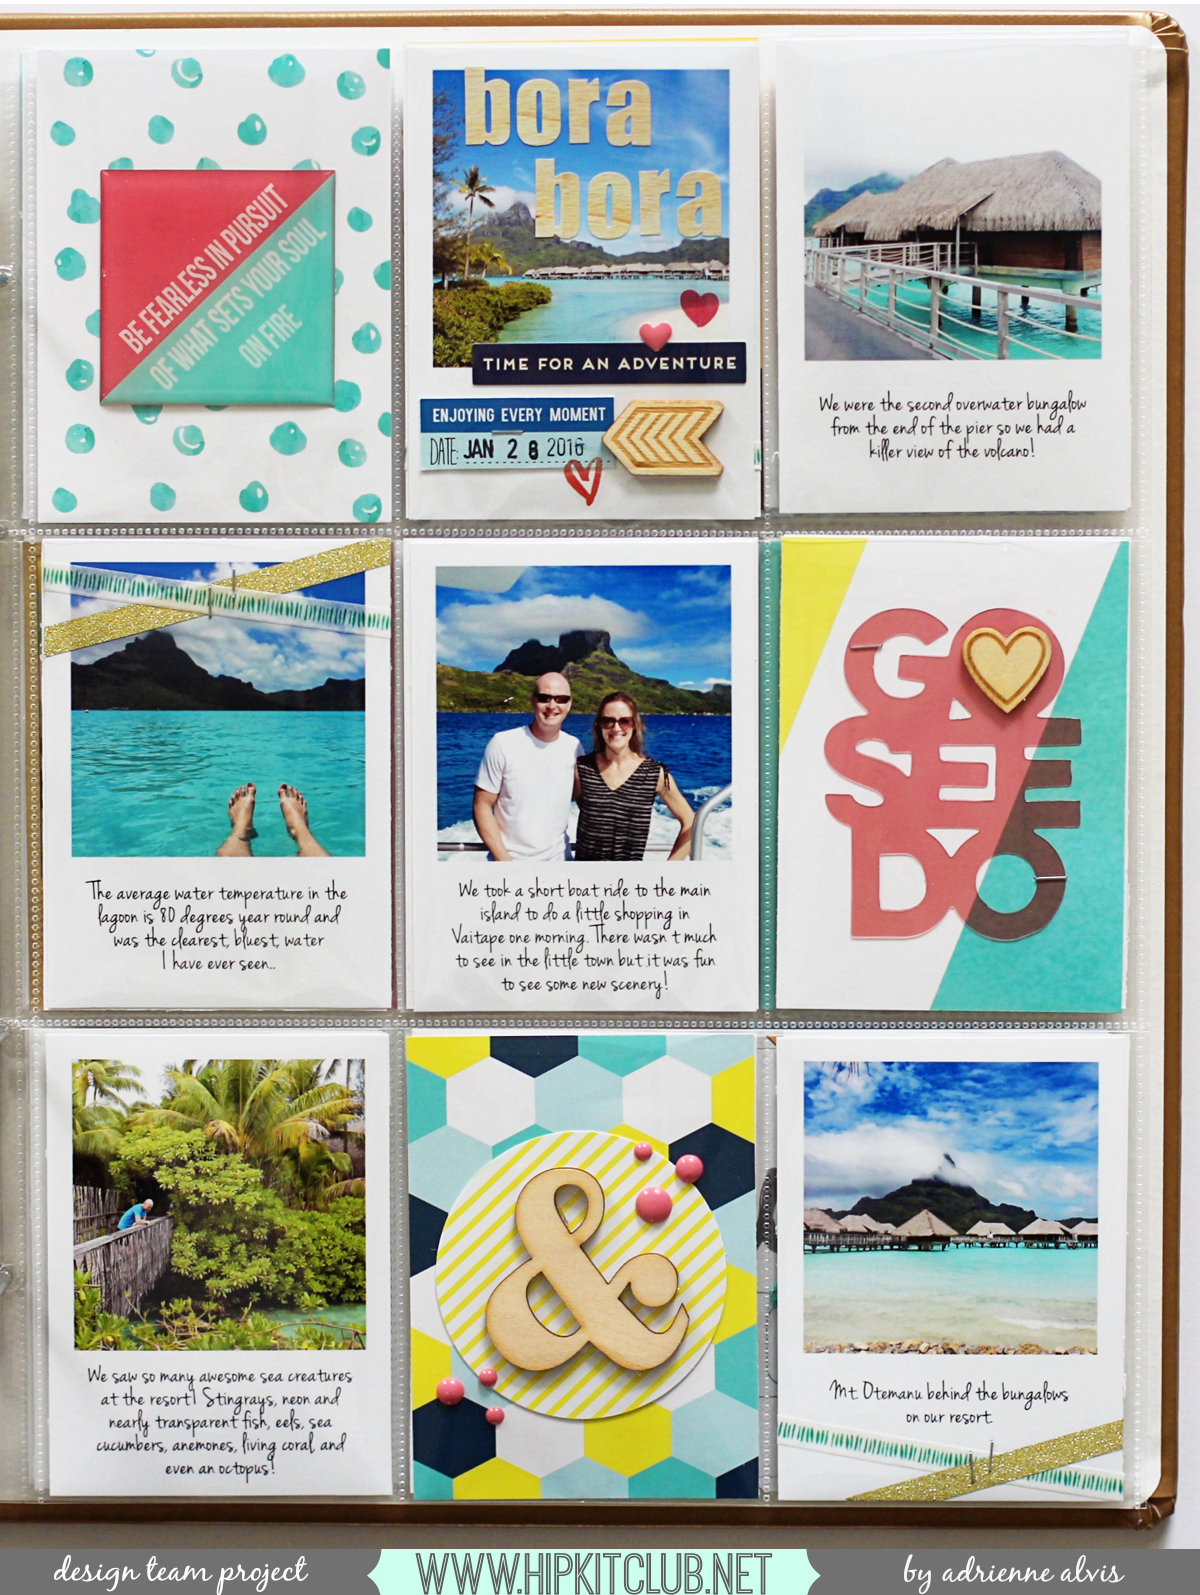
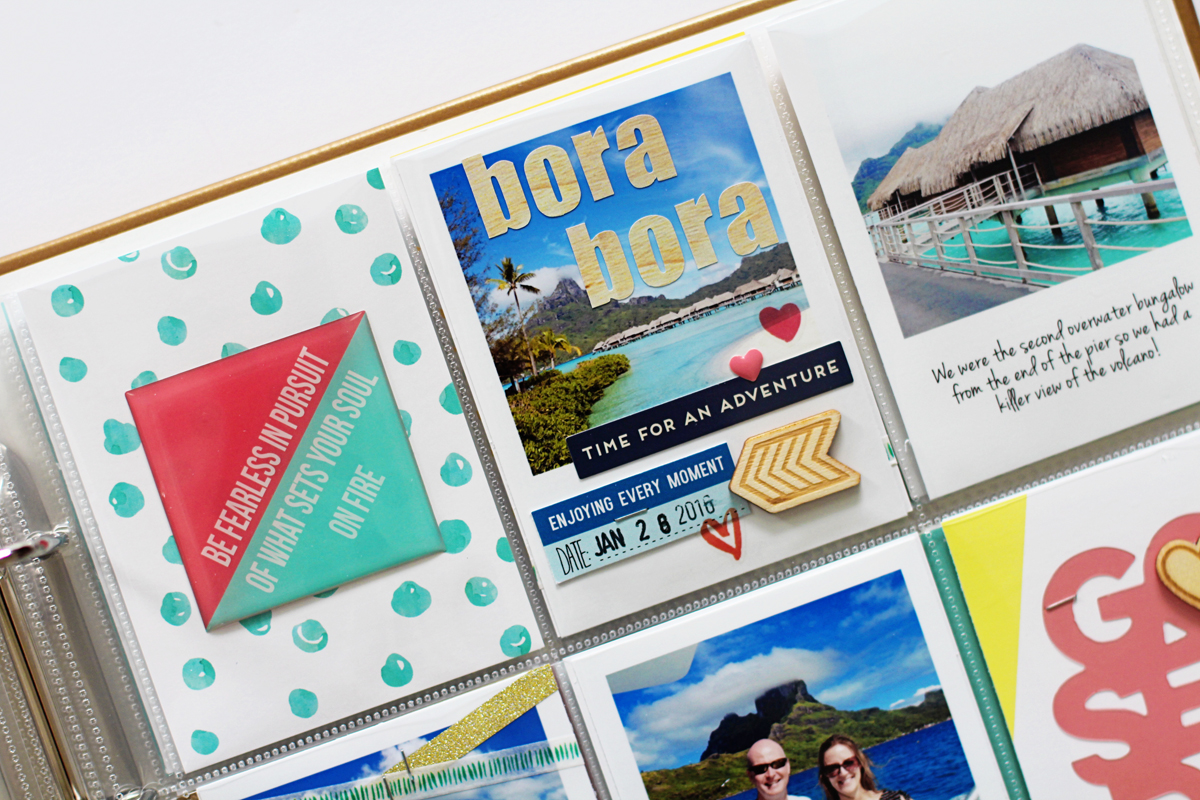
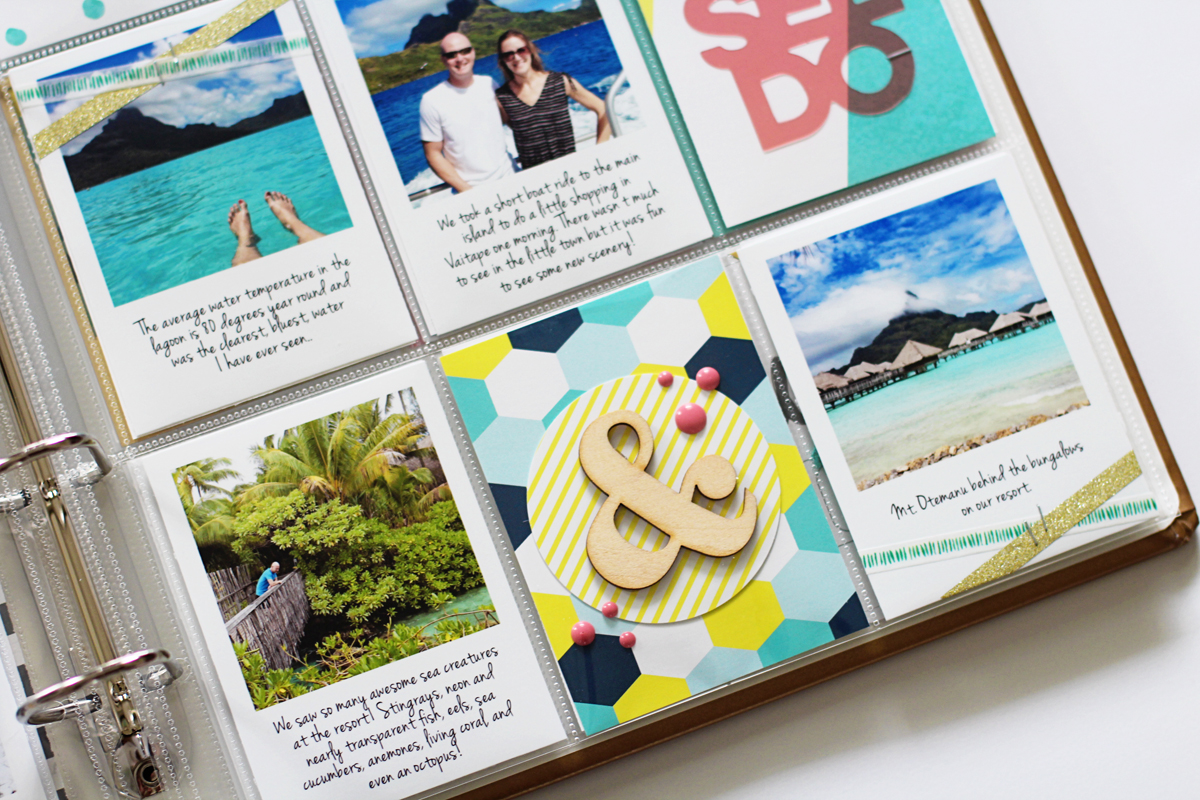
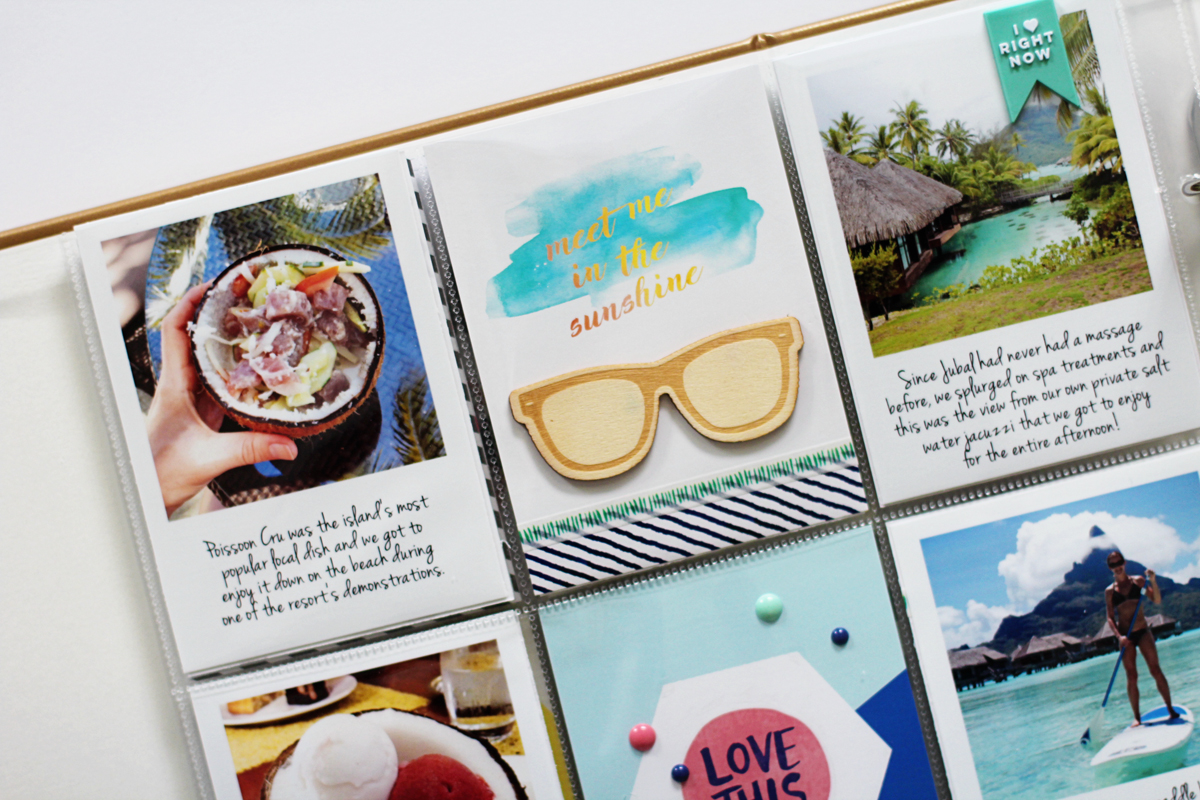
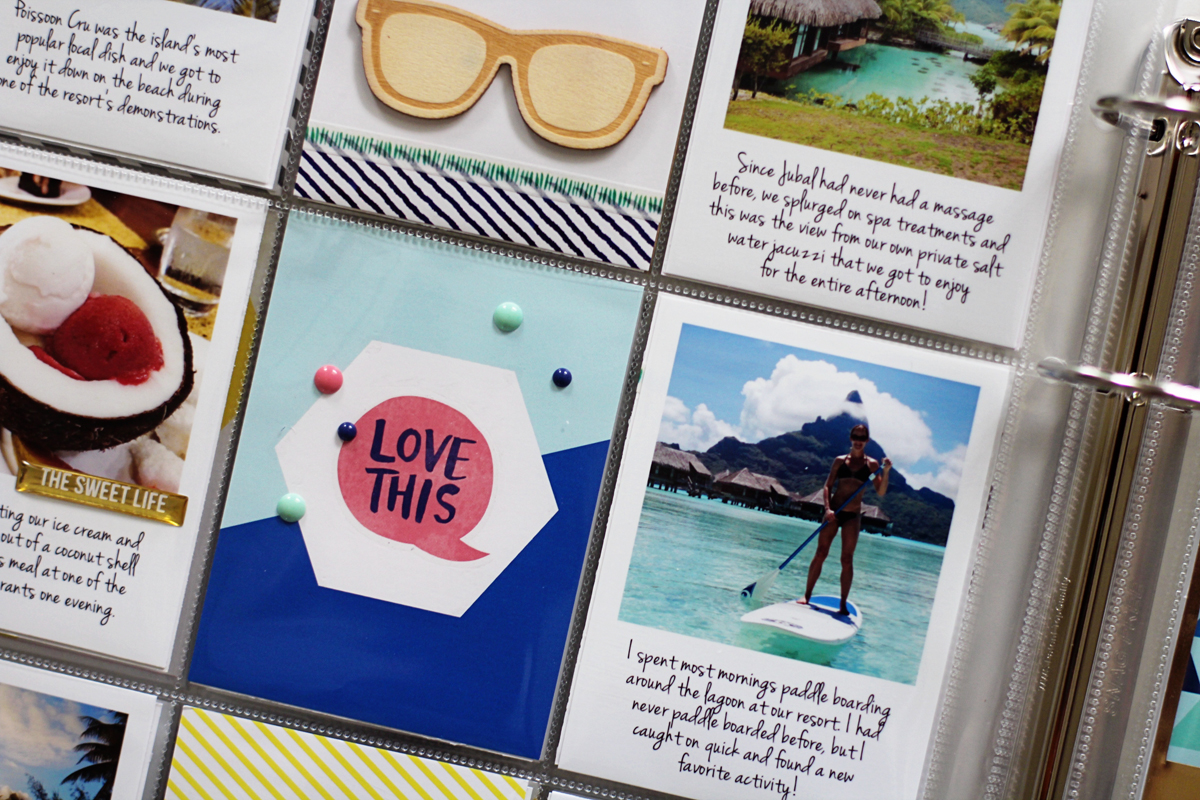
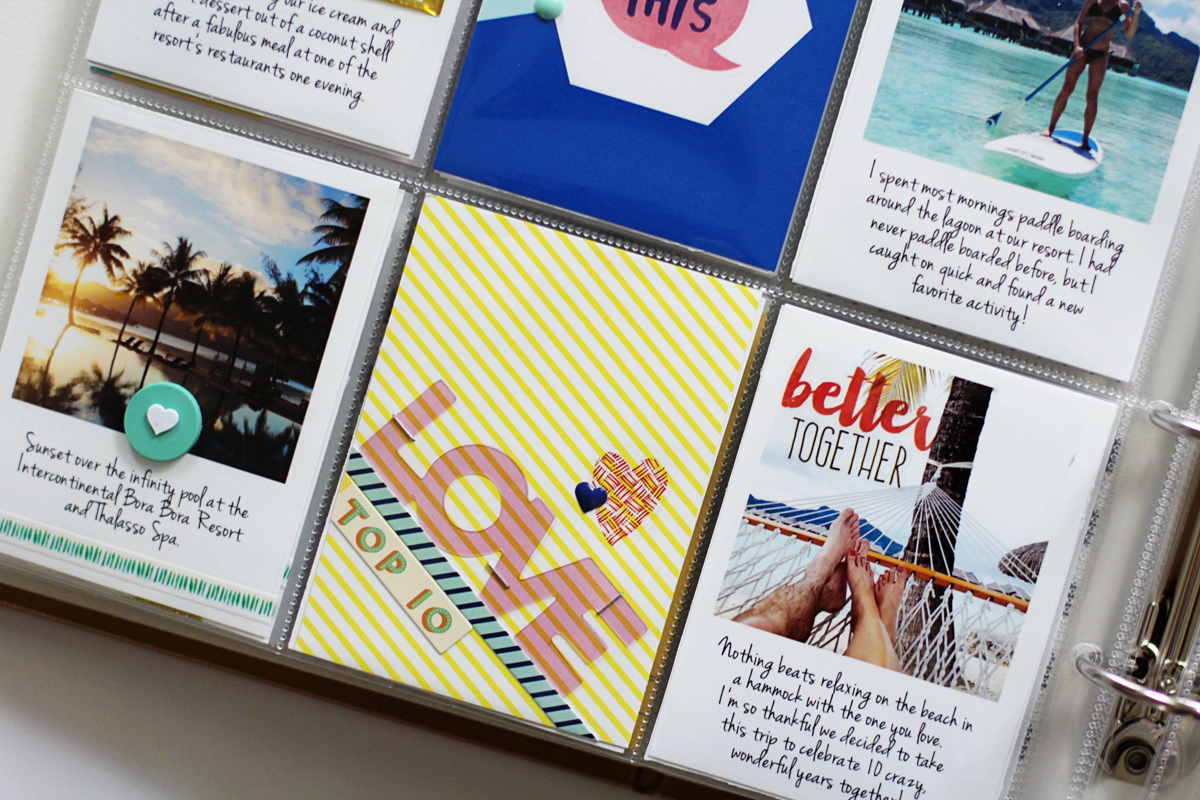
Next up, I have a little tutorial on the Hip Kit Club blog on how I embellished some of the Project Life cards from the April 2016 Project Life Kit.


I utilized items from this month's Color Kit and embellishment kit as well as some of this month's cut files to jazz up some PL cards that I will be using on my April spread that will be on the Hip Kit Club Facebook page next Tuesday. 


You can see my full tutorial on how I embellished these cards HERE.


One more thing that I have to share with you today is the Hip Kit Club NSD Online Crop has been announced!!!!!


This will be hosted in our Facebook Member Forum so be sure and join us for and amazing weekend!  And if you're on the fence about joining Hip Kit Club, this will make it totally worth it so I hope to see you there! 

Have a wonderful day and thanks for dropping by! 


4.20.2016

Cute Capture *Hip Kit Club*

Hey everyone! 

I shared this layout over on the Hip Kit Club Facebook page yesterday using one of this month's exclusive cut files from Hip Kit Club and the April 2016 Hip Kits


I started by placing three of the heart-shaped cut files designed by Ashley Horton vertically down the left side of my page and added my photos that I layered under a couple of the Heidi Swapp Minc photo frames around the hearts. 


I typed my journaling on a piece of vellum and placed it in one of the gold foil puffy stickers from Pinkfresh Studio. I placed it next to the top photo of my daughter and her cousin at one of their dance competitions and layered the ampersand letter sticker (also from Pinkfresh Studio) on top. 


I used one of the acetate phrases from Pinkfresh Studio and more of the yellow puffy letter stickers to create my title. I layered several wood veneer hearts from Elle's Studio and a few of the exclusive HKC star acrylic pieces around it. 


Finally, I added a couple of the Shimelle Ephemera pieces and clustered them around the photos at the bottom of my page. I really love how well that yellow "oh yeah" HKC exclusive flair pieces matches the other yellow elements on my page! Be sure and check out my post on the Hip Kit Club Facebook page and have a wonderful day! 

4.13.2016

Funny Friends and A Project Life Insert *Hip Kit Club*

Hey everyone! 

It's Friendship Week and I'm sharing a layout I created using the last of my March 2016 Hip Kits, along with a Project Life insert using some of my favorite vacation photos and the new April 2016 Hip Kits over on the Hip Kit Club blog!

First up I have a layout that I created celebrating my daughter and my nieces adorable and very comical friendship...

funnyfriends1

I used items from the March 2016 Hip Kits for this layout and started by layering a few leftover criss cross cut file pieces on top of some white card stock that I painted three yellow boxes on using the Shimmerz Crazy Daisy watercolor paint that's available in the March 2016 Color KitI love how the yellow paint makes the striped criss cross cut files pop!

funnyfriends2

Next, I layered my photos on top of the Just Dream Fanstasy exclusive HKC patterned paper that was designed by Kim Watson and adhered them to my page using some foam adhesive dots for a little extra dimension. I cut the speech bubble out of one of the journaling cards in the March 2016 Project Life Kit and used it for my journaling and added my title "Funny friends" using the Maggies Holmes Thickers and the "friends" sentiment from the BasicGrey Saturday Morning Cork Sticker Sheet (both available in the March 2016 Main Kit).

funnyfriends3

I made several different sized circles using some punches and the Just Dream Carefree patterned paper and placed them randomly around my page to mimic confetti. I also placed two of the Elle's Studio Little Moments Die Cuts from the March 2016 Project Life Kit on one of my photos and in one of the confetti clusters for a pop of black and accented them with some of the BasicGrey enamel dots and black ink splatters.

funnyfriends4

Next up I have a Project Life insert that I created using the April 2016 Project Life Kit and photos from my recent wedding anniversary trip to Bora Bora to share with you!

PLinsert1

I used my favorite photos from our trip that I edited in Photoshop Elements and several of the exclusive PL cards from the April 2016 Project Life Kit that were designed by Kim Watson and Kimberly Hutchison. I embellished the cards using items from the PL kit such as the My Mind's Eye Wood Veneer Shapes, Enamel Dots, and some of the Shimelle Star Shine Phrase and Alphabet Stickers.

PLinsert3

I used some Pinkfresh Studio items as well and I really like the dimension the Life Noted Epoxy Stickers give my spread without adding lots of bulk. I also added a few strips of the Amy Tangerine Better Together Washi Tape and criss-crossed it on top of a few of my photos for a fun twist.

PLinsert4

I added the "GoSeeDo" acetate word phrase that's also from Pinkfresh Studio and available in the April 2016 Main Kit and layered it on top of one of the 4x6 PL cards after I cut the card in half to fit into the 3x4 pocket and placed one of the My Mind's Eye Wood Veneer Shape heart stickers in the "o".

PLinsert5

And here's a look at the other side of my PL insert...

PLinsert2

It was hard to narrow down the photos that I wanted to include in this insert since I took over 1,000 on our trip, but I'm also going to make a hardcover photo book for our coffee table so I managed to pick out the photos that I thought gave the best overview of our trip.

PLinsert7

PLinsert6

I kept the overall design of this side much like the other one and used a few of the Amy Tangerine Better Together rub-ons from the April 2016 Main Kit to embellish the PL cards  from the Project Life Kit and a couple of my photos.

PLinsert8

I've been meaning to add these photos from our trip to my Project Life album for quite some time now and using the April 2016 Project Life Kit made it so easy to complete! Thanks so much for dropping by and I hope you have a wonderful day!

4.06.2016

Go.See.Do. *Pinkfresh Studio & JustNick Studio Blog Hop*

Hello everyone! 

Pinkfresh Studio and JustNickStudio have collaborated and are blog hopping all week so I created  this layout using the Felicity and Life Noted collections from Pinkfresh Studio and a fabulous cut file from JustNick Studio


I used the On An Adventure cut file from JustNick and paired it with patterned paper from the Felicity and Life Noted Collections. 


I layered bright yellow and pink patterned paper pieces under certain parts of the cut file and placed my photos next to the arrow image. I added several color block wood veneer stickers around my page for extra dimension. 


All week long we'll be blog hopping with the JustNick Studio design team so head on over to the Pinkfresh Studio blog and leave a comment so you can get a chance to win a $25 gift card to JustNick Studio! And then make sure to head over to the JustNick blog and leave a comment for a chance to win $50 goodie bag full of Pinkfresh Studio products! Full details here

Thanks so much for stopping by and have a great day!

4.05.2016

March 2016 Project Life *Hip Kit Club*

Happy Tuesday, friends!

I'm sharing my monthly Project Life spread over on the Hip Kit Club Facebook page today! 


I created this spread using the March 2016 Hip Kits ...and yep, I'm still loving the 9x12 sized album!


I printed my photos off first and since I'm adding my journaling directly to my printed photos (timesaver!), I can spend more time embellishing the empty slots with journaling cards and embellishments. 


I used journaling cards from the March 2016 Project Life Kit from HKC and used embellishments from the rest of the kits to fancy up my journaling and filler cards. All the cards in the PL kit are designed by our very own Kim Watson and are HKC exclusives! 


I used a mixture of wood veneer pieces from Elle's Studio and cork stickers from BasicGrey as a contrast color to my overall color scheme of aqua, gray, and pink. 


I'm still keeping my overall design fairly minimal but I did layer up a few filler cards on this month's spread. 


Be sure and grab you March and April Hip Kits before they're all gone! They are packed full of inspiring products and coordinate well with any project.


Until next time...Have a great day!

4.03.2016

Pinkfresh Studio Felicity and Life Noted Collection Layouts

Hello everyone! 

I'm sharing two layouts that I created using the Felicity and Life Noted Collections from Pinkfresh Studio over on the Pinkfresh blog today!

My daughter, Avery, turned 7 last month and the beautiful papers and embellishments from the Felicity Collection were perfect for documenting one of my favorite photos of her from that day!


I pulled colors from my photo for my overall color scheme and used a big butterfly cut file as the main element of my page. I backed the cut file with some yellow card stock so the silver glitter paper would stand out better. I also used a fine-tipped black marker to trace around the butterflies to give it even more contrast and to coordinate with the "seven" foam letter stickers I used for part of my title. 


I placed the photo of my daughter near the bottom right-hand corner of my page and added several of the Felicity Word and Phrase Stickers in a vertical line down the colored bars of the patterned paper. 


I used a few of the Felicity die cut shapes, color block wood veneer stickers, and some bright pink puffy sequin stickers to embellish my layout and to help coordinate with my color scheme.

For this next layout, I used the Life Noted Collection and kept my design more modern and graphic...


I started this page by placing four of the Life Noted Acetate Die Cut Words around my photo and cutting the background paper diagonally down the middle. I layered the diagonal piece on another piece of patterned paper from the collection and cut apart strips from the square tiles/grid patterned paper piece and placed them in a stacking pattern connecting them to my original piece of paper. 


I added some of the Wood Foil Stickers, as well as a few of the Foiled Epoxy Stickers from the Life Noted Collection, and placed them on some of the square tiles for added dimension and contrast.  


I finished my page with some typed journaling and placed it in one of the Foiled Epoxy Sticker frames and added a few ink blots with some navy spray ink. 

I really love how each collection is so versatile and can be used for any type of scrappy style or project. Thanks so much for stopping by and I hope you have a wonderful day! 

4.01.2016

April Embellishment Kit Projects *Freckled Fawn*

Hey everyone! 

The April Embellishment Kit from Freckled Fawn just went live and here are two layouts that I created using the kit...


For this page I was really inspired by the arrow washi tape from the April Kit and by the lines of the sunburst patterned paper that I chose to use as my background. I placed long strips of the arrow washi tape in the white spaces of the sunburst pattern and then placed my photo towards the center of it, hiding the ripped ends of the washi.


I wanted to bring out some of the gorgeous blue hues of my photo so I punched out different sized circles from some coordinating patterned paper and scattered them around my page. 


I layered the "This" chipboard arrow on top of a few other scraps of paper and placed the "dream" wood veneer sentiment underneath of it to complete my title. I simply used a black Sharpie marker to alter the wood veneer phrase. 


I also added several of the black enamel octagons around my page near the circle clusters and stamped directly onto the wood veneer tag that's available in the April Kit using some black StazOn ink.


For this layout, I was really inspired by the bright happy colors in the "Adventure" chipboard sticker so I thought it would look great with a photo of my daughter counting all of the eggs she found this past Easter.


I used the smaller vellum letter stickers to complete my title and layered the "fun" acrylic words around my photo.


I also placed several enamel dots from the April Kit around the octagon shaped chipboard stickers and placed several pieces of thin washi from last month's kit on my page to add a little more color. 


I created some fun angles on this page using some patterned paper pieces I had left over from other projects and kept my overall color scheme bright and colorful, just like her eggs :) 


Be sure and grab you April Kit before they're gone! Thanks for dropping by today!