6.29.2016

Live Colorfully *Hip Kit Club*

Hi crafty friends!

I shared this layout on the Hip Kit Club Facebook page yesterday...


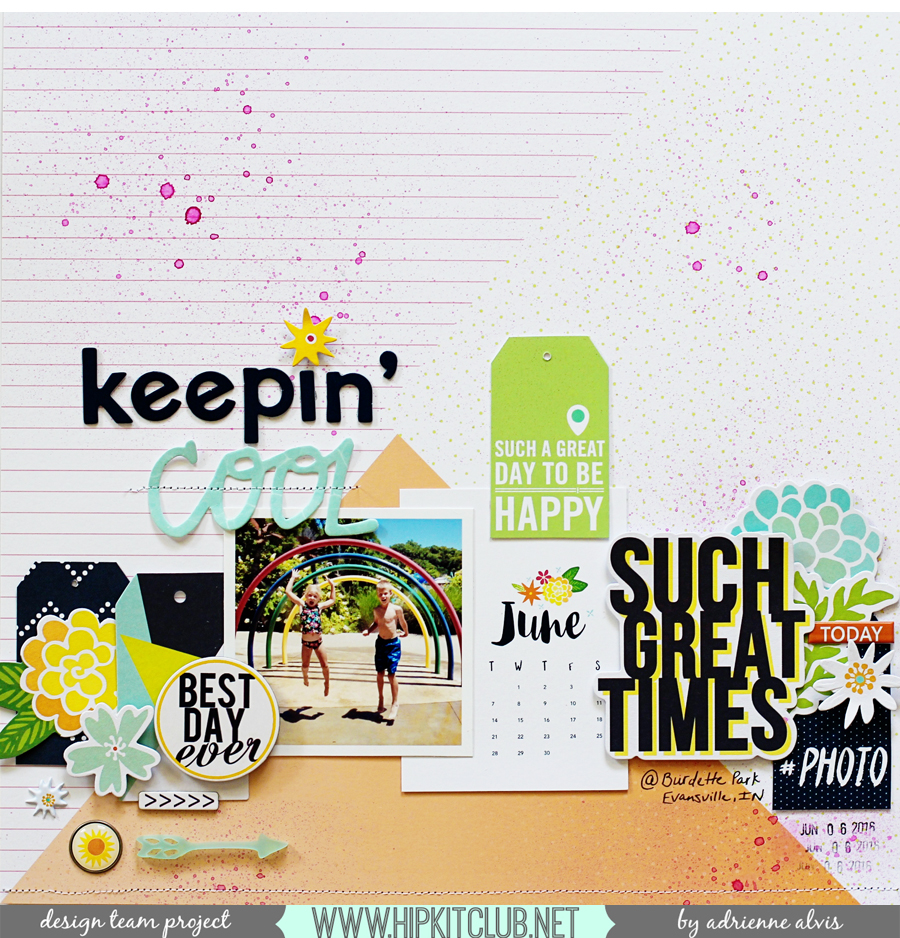
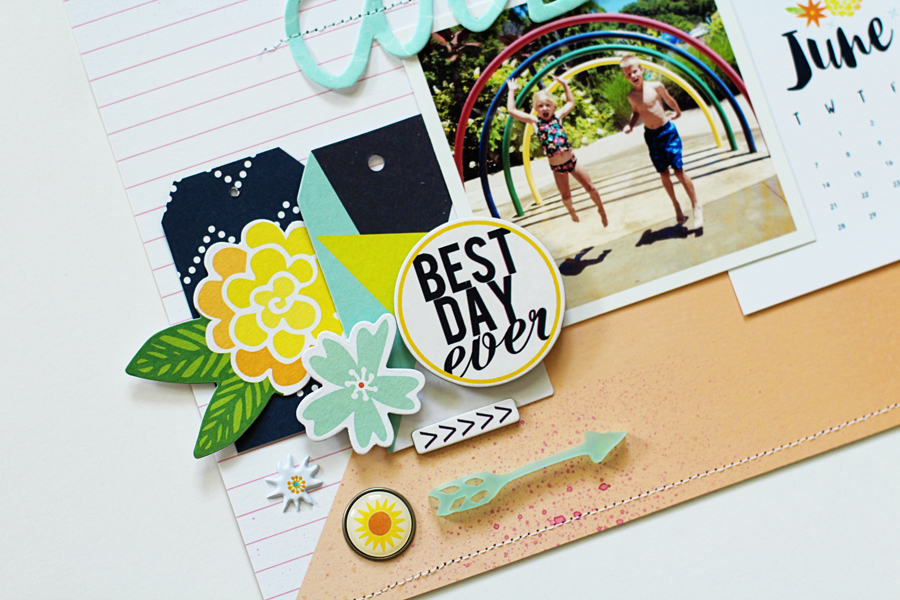
I used items from the June 2016 Hip Kits to create this colorful page. I started with the color kit and misted my background images using the negative pieces from one of this month's cut files available here


I added several different sizes of the same cut file that I used to create my background around my photo and layered the decorative buttons from the Pink Paislee Fancy Free collection on top of them. 


I used one of the Dear Lizzy Happy Place watercolor phrases as my title and placed one of the HKC exclusive puffy stickers next to it along with a rubber shape sticker from the Maggie Holmes Bloom collection available in the June 2016 Embellishment Kit


I love how bright and happy this layout turned out and how it compliments the fun photo of my daughter having fun and celebrating the end of school for the summer. The June 2016 Hip Kits are packed full of lovely items to help you create any paper crafting project! 

Have a wonderful day! 

6.22.2016

Keepin' Cool *Hip Kit Club*

Hi everyone! 

I shared a really super simple and quick way to add a few tags to a layout on the Hip Kit Club blog yesterday. I used the June 2016 Hip Kits for this page and I really love how the fresh summer vibe and colors in this month's kit look with the photo of my two youngest kiddos having a blast at a local splash park.

keepincool1

I grabbed the geometric tag from the HKC exclusive Everyday ephemera pack (available in the June 2016 Main Kit) and a couple of coordinating PL cards from the June 2016 Project Life Kit and positioned the geometric tag on top of where I wanted to create a new tag, using it as a template.

keepincool2

I placed the original tag over the sentiment or design I wanted to use from the PL cards and simply hand cut around it to create a new tag. I also used a very small hole punch to create holes at the top of the new tags and in just a couple of minutes I had enough tags to use on my layout.

keepincool3

I layered one of the tags over the June calendar PL card and another under the "Such Great Times" sentiment ephemera piece on the right side of my page. I also placed an Everyday puffy sticker from the June 2016 Embellishment Kit and a few more ephemera pieces around the tag making an easy embellishment cluster.

keepincool5

I added the original geometric tag that I used as my template along with another tag that I cut out from the lovely Jen Hadfield Everyday Dotted Chevron patterned paper, which is available in the June 2016 Paper Kit, and layered them together on the left side of my page to balance out my overall design.

keepincool4

I hope I've given you some inspiration on creating your own tags and using them for your next project. Sometimes if I'm in a hurry (or just being lazy) I like to cut things out quickly and easily by hand rather than set up my computer or Silhouette.

Thanks so much for joining me and have a wonderful day!


6.21.2016

Freckled Fawn and Tombow Team Up!

Hey everyone!

Freckled Fawn and Tombow have teamed up this week to give everyone a lesson in Adhesives 101!

I'm sharing how I used several different Tombow adhesives on these two layouts over on the Freckled Fawn blog. The Tombow adhesives made it super easy to attach even the most difficult FF embellishment so be sure and check out my full tutorial here.

Fave 


Let's Go


I used embellishments from various Freckled Fawn kits and Tombow adhesives for both of these pages. The Monotwin marker was also fun and easy to use and even writes on washi tape! Be sure and check out the FF blog and the Tombow blog for all kinds of inspiration and information you need to complete your next project!

Thanks so much for stopping by today!

6.15.2016

PL Cards and a Layout! *Hip Kit Club*

Hello crafty friends! 

I shared these Project Life cards I created using the May 2016 Hip Kits on the Hip Kit Club Facebook page the other day and a layout celebrating dad's week, too! 


I'm in the process of a putting together a little project so I created these PL cards using the May 2016 Project Life Kit to include in it.


I love how the May 2016 Hip Kits color scheme coordinates with almost any project :)


I used the May HKC exclusive die cuts, puffy stickers, and journaling cards from the Meadowbrook collection to create these cards.


I also added items from Bella Blvd., such as the enamel hearts to accent some smaller details of my cards as well.


For the layout that I created celebrating dad's week, I used items from the May 2016 Hip Kits to complete my page...


My oldest son and my husband have a very special relationship and the Brad Paisley song, "He Didn't Have To Be", pretty much sums it up so I used it as my title and the main inspiration for my page.


I used a couple of the Simple Stories chipboard frames to house my journaling and date stamp on my layout.


I layered several of the HKC exclusive patterned papers on the background patterned paper from Illustrated Faith and kept my overall color scheme of red, black, and yellow with a pop of aqua.


Obviously, the aqua color pop was from the Jillibean Soup letters (available here) and I really like how they stand out.


Thanks so much for stopping by today and be sure and check out the reveal for the July 2016 Hip Kits here!!!

6.09.2016

Selfie Love *Hip Kit Club*

Hey everyone! 

I shared this layout on the Hip Kit Club blog the other day. I created this layout using the May 2016 Hip Kits and one of the May cut files available for free to subscribers. 


I was in need of some selfie photos so I could update my social media profile pics and these were a few of my favorites! I placed my photos on top of a piece of the Meadowbrook exclusive patterned paper from HKC and used the fun "Hello" patterned paper from Jillibean Soup as my background.


I layered lots of the HKC exclusive die cuts from the Meadowbrook collection along the right side of the triangular piece of patterned paper and several of the navy sequins from Jillibean Soup that are available in the May 2016 Embellishment Kit and enamel dots from Echo Park for some added texture and dimension.


I placed one of the exclusive acrylic arrows under the "documented" sentiment on the chipboard frame from Simple Stories and layered the "love" part of Ashley's cut file next to the "selfie" die cut for my title.


I arranged my photos in a haphazard way to give my page a more whimsical and casual vibe and I'm glad I got the opportunity to use photos of myself on this page because that doesn't tend to happen very often ;)


Be sure and check out the HKC blog for more info about my layout and have a wonderful day!

6.07.2016

Let's Get Sketchy Collaboration *Freckled Fawn*

Hi everyone!

This month the Freckled Fawn design team has teamed up with Let's Get Sketchy for some amazing inspiration! 

Here's the sketch I used for my layout...


I used a photo of my favorite rose blooms in my yard from earlier this spring. I started by misting the white card stock with some bright pink spray ink to match the roses and then layered some various black and white patterned paper pieces underneath my photo for contrast. 


I layered one of the wood veneer squares from the June FF Kit, "Citrus Twist". under my photo on the right side of my page and added my journaling on the opposite side on top of a wood veneer tag, also from Freckled Fawn. 


I added several black puffy hearts and the Take Note paperclip from the June Kit for added texture and dimension.  I used the "bloom" cork sticker sentiment from the May Kit for my title and added it directly to my photo. 


I love the simplicity of this sketch and how I could easily add a few extra layers to make it more "me". 


For even more inspiration using this sketch, be sure and head on over to the Let's Get Sketchy blog and check out how the other members interpreted the sketch! 

Thanks so much for stopping by and I hope you have a fabulous day! 

6.04.2016

Spring! and Live Life In Full Bloom *Pinkfresh Studio*

Hey friends!

I shared these two layouts on the Pinkfresh Studio blog yesterday...


I used the lovely Felicity collection for this page and a fun ribbon cut file from JustNick Studio!


I arranged the photos of my daughter picking early spring daffodils near the center of my page, about one third of the way down and placed my title directly under the photos. I love how the foam letter stickers from the Felicity collection really stand out against the other colors I used on my page.


I clustered different embellishments from the collection around my photos and down the right side, tucking a few into the cut file.


For this next page, I used one of my favorite photos of my roses blooming and the Life Noted collection from Pinkfresh Studio.


I typed my journaling on a piece of vellum and punched it out using a large circle punch. I used a few color block wood veneer stickers and some puffy sequin stickers from the Felicity collection to embellish around my journaling. 


For the title of my page, I used part of a stamp from the Felicity collection and added the last word using large puffy yellow letter stickers because it filled the bottom of the patterned paper from the Life Noted collection perfectly!


I love how these two collections bring out different styles and inspiration from my creative brain. The first layout was much more whimsical and fun, while the second was more modern and streamlined. And I love them both!

Thanks for stopping by and I hope you have a great day!


6.01.2016

Today We Are Making Memories And A Project Life Spread *Hip Kit Club*

Happy first day of June, everyone! 

I really can't believe this year is almost half over already! Yikes!!! Yesterday I shared this layout and my Project Life spread for the month of May on the Hip Kit Club Facebook page using the May 2016 Hip Kits


I was inspired by the chipboard phrases by Bella Blvd (available in the May 2016 Embellishment Kit) and how they popped against the aqua stripes of the gorgeous HKC exclusive patterned paper from the Meadowbrook Collection so much that I decided to use them and the navy puffy letter stickers for the title of my page. 


I placed my journaling and the photos of my daughter enjoying a beautiful warm day in the Simple Stories Chipboard Frames and lined them up horizontally across my page and layered some of the wood veneer pieces from Jillibean Soup on top of them. 


I punched several circles from the Meadowbrook patterned paper out and scattered them around my layout so it would help draw the eye around my page and add a little extra pop of color. 


I really love how this page turned out and I love using bright, happy colors for summer-themed photos. 


Next up I have my Project Life spread for the month of May to share with you. 


I kept my overall design clean and simple and added some pops of navy and pink around my spread for some color. 


I used the May 2016 Project Life Kit for this spread and I really love the HKC exclusive PL cards that came in the kit. 


I added some of the Jillibean Soup wood veneer Wordfetti phrases on my photos and placed several of the navy sequins and Illustrated Faith enamel hearts around my spread for extra dimension and color contrast. 


Have you been staying caught up with your PL spreads this year? I must say that since I've switched to monthly PL pages, I find it much easier to keep up with it and I feel like the 9x12 size is perfect for my PL documentation. 


I hope you have a great day and thanks for dropping by!