2.23.2016

Love. *Hip Kit Club*

Hey hey everyone!

I'm sharing a layout I created using the February 2016 Hip Kits as well as the February Moodboard on the HKC Facebook page today!


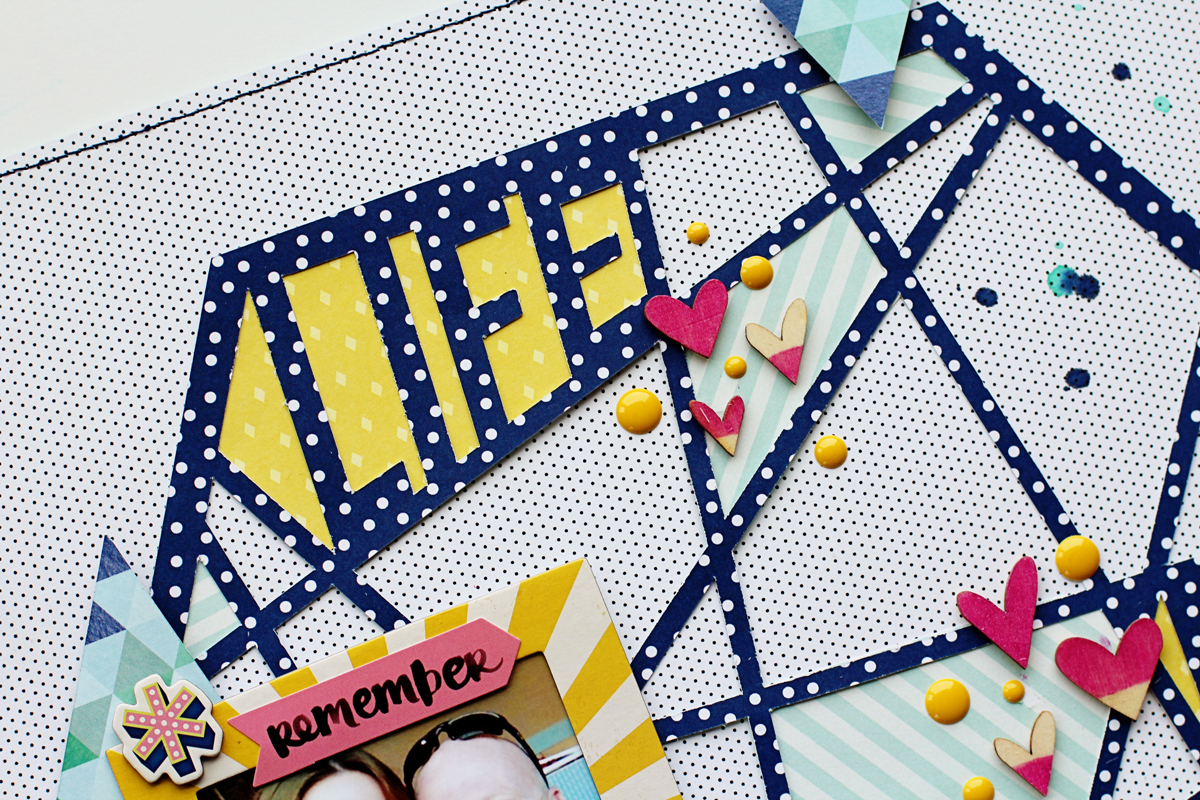
I was really inspired by the hearts, stripes, and the wood tones in this moodboard and here's how I translated them onto my page...


I used a couple of my "old school" punches and punched out two different sized hearts from the bold striped patterned paper that's available here. I backed the negatives of the hearts with some floral patterned paper (which is actually the pattern on the back of the striped paper) and then used the punched pieces around the rest of my page. 


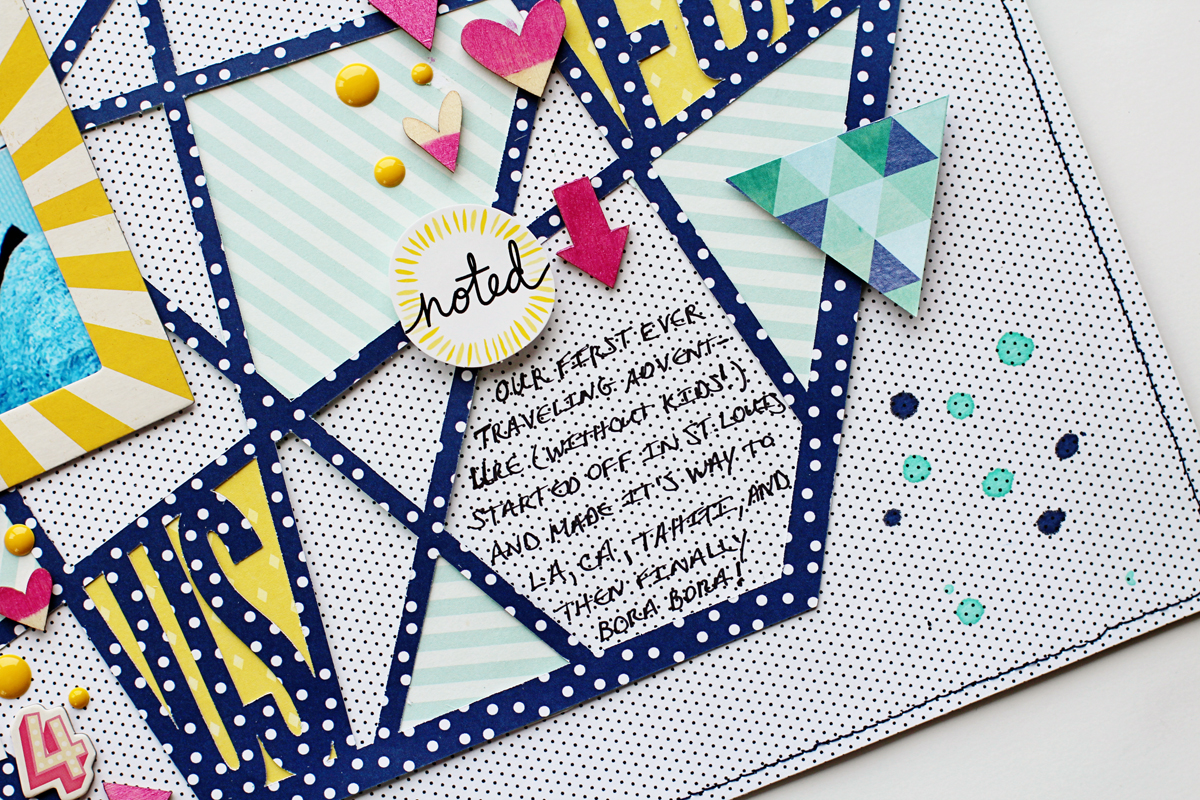
The photo that I decided to use on my page is a shot of a heart drawn in the sand from our recent 10th anniversary trip to Bora Bora so the heart motif was perfect for this page ;)


I added a few gold glitter cork heart stickers from Pink Paislee to add an extra color contrast to my page and to emulate the wood tones in the moodboard.


Be sure and check out my FB post here and check out the new March HKC kits on the website...they're so gorgeous and perfect for all of you spring-inspired crafty projects!

Thanks for stopping by and have a wonderful day!

2.16.2016

Just 4 Us *Hip Kit Club*

Hello friends! 

I'm sharing this layout that I created on the Hip Kit Club blog today using the lovely February 2016 Hip Kits and one of the February 2016 cut files designed by our very own Kim Watson!


I started creating this page by cutting out this cut file using one of the Better Together Amy Tangerine patterned papers available in the February 2016 Main Kit and layering it on top of a piece of the Pink Paislee Ce'La Vie - Paper 12 patterned paper.

just4us3

I layered bold yellow pieces of patterned paper from Paper 10 of the same Pink Paislee collection under the words "Life", "Fun", and "Us" to make the words stand out on my page. I also added a few pieces of the aqua striped patterned paper for added color contrast and to soften all of the pops of yellow.

just4us4

I used a yellow sunburst photo frame from the Shimelle Chipboard Sticker pack that's available in the February 2016 Embellishment Kit to frame the 3x3 photo of me and my husband waiting at the airport to leave for our anniversary trip together. I also painted several of the wood veneer hearts and a couple arrows from Studio Calico (available in the February 2016 Project Life Kit) using some of the pink Shimmerz texture paint from the January 2016 Color Kit to add another bright color to my page.

just4us6

I journaled in one of the open spots of the cut file and added the "noted" sticker from the Amy Tangerine Sticker Book to draw the eye toward my journaling and to coordinate with the pops of yellow on my layout.

just4us5

I just adore the color combination possibilities in the February 2016 Hip Kits! If you're a fan of bold and bright or soft and muted, these kits have a little bit of both to accommodate your projects and your tastes! 

Thanks so much for stopping by...I hope you have a wonderful day!

2.12.2016

JustNick Guest Designer and A Free Cut File!

Happy Friday, friends!

I'm so thrilled to be a guest designer over at JustNick today! If cut files are your jam then this is the place to go for all of your cut file needs! Seriously...there are some amazing cut files designed by my fellow Hip Kit Club DT member, Nicole Nowosad and tons of inspiration from her team on how to use them on the blog!

I created two layouts using some of her amazing files for my guest spot and the first one is titled "Lego Love"...


For this page, I used the Snowflakes cut file from her shop and the "Love" sentiment from the "That's Amore" freebie cut file that you can download for free using the code SWAKFREE at checkout by February 29th, 2016. I resized and cut out the snowflakes from a piece of white card stock and then layered it over a piece of sea foam green card stock.


I cut the snowflakes out again using a bright, aqua piece of card stock and layered several of them on top of the cut out snowflakes from the white card stock.


I used the "Love" sentiment as part of my title and placed the "Lego" foam letters on top of the heart. I really like the contrast the black and white elements give my page and the snowflakes were the perfect motif for the photos of my daughter holding her Frozen Lego castle she built all by herself.


For this next layout, I used the Brick Circle cut file and the SWAK sentiment that's also from the freebie cut file.


I enlarged the brick circle and placed various pieces of patterned paper under each brick. Then I added several of the SWAK sentiments and sized them to fit inside of the bricks.


I used black thread and my sewing machine to stitch around the entire brick circle and layered several chipboard stickers around my photos to help draw the eye around the circle.


I printed my photos off in black and white for added contrast and to coordinate with the black elements on my page. 


Please be sure and head over to the JustNick blog to download the Freebie Cut File that was designed just for my guest spot. It's perfect for all of you Valentine's Day projects or love inspired layouts!

Thanks so much for joining me here today and I want to thank Nicole for having me as a guest DT as well!

xoxo

2.09.2016

January 2016 Project Life *Hip Kit Club*

Hello and happy Tuesday, everyone!

I'm so excited to share my first Project Life spread for the new year with you today! I'm also sharing this on the Hip Kit Club Facebook page. I changed up my entire design for 2016 and I'm so thrilled with the results!


I used the January 2016 Hip Kits for this spread. I love how well the pink and gold accents paired with the black and white patterned papers that I used for my spread. I've always used a 12x12 album for my PL, but this year I'm jumping on the 9x12 bandwagon and loving the results!


I printed my photos off in a different size (adding more white space) and typed my journaling at the bottom under the photo, which was completely different for me, but I love how it turned out! And I love how much easier it is for me to journal using this new design.


I used some of the My Mind's Eye My Story Rub-ons and I really like how easy it was to add them to my photos and how they look like they were printed off of my computer.


Another change I made to my 2016 PL album was documenting the full month on a spread instead of just a week. I don't take as many photos as I used to since my kiddos are in school full time so this helps take the pressure off of never having enough photos for a week's spread. 


I love how I still have lots of room to embellish and decorate my spread and how I can easily incorporate more photos if I have to in later months.


I was really nervous about switching up my PL design and process since I've been doing it for so long, but the change has really refreshed my creative mind and has given me a lot more inspiration for this year's album. I hate to admit it but I was actually getting a little bored with my PL so this was just what I needed to power through.


Have you decided what format your'e using for Project Life this year or are you sticking with your tried and true method? If you've never attempted PL, I hope I've given you a little inspiration to begin! It can be as simple or as elaborate as you want it to be. And if you have any questions about starting the process, please feel free to ask! I love sharing info about my PL and would be happy to answer :)

Thanks for stopping by today!

2.05.2016

Pinkfresh Studio Projects

Hey everyone!

I shared these two projects on the Pinkfresh Studio blog the other day...


For this layout, I used products from the brand new Felicity Collection.


I love the bright, happy colors that are in the collection and all of the springtime accents!


I kept my design for this page along the same diagonal as the striped patterned paper and offset my photos so they would stand out from the rest of the page elements.


Next up, I have a PL spread from Week 49 & 50 from 2015 that I paired with the Life Noted Collection...


I kept my overall design simple for these two weeks in December and used a gold, pink, and red color scheme.


 I also used the Life Noted stamp set and stamped a few images and accents throughout my spread.


And here's the full spread for Weeks 49 & 50 from 2015...


Be sure and stop by the Pinkfresh Studio blog for even more details about my projects and to see more inspiration using the new collections. Thanks so much for stopping by and have a wonderful day! 


2.02.2016

Made With Love *Hip Kit Club*

Hello everyone!

I'm sharing this layout that I created using the January 2016 Hip Kits on the Hip Kit Club blog today!


I used the January Sketch as inspiration for my page and stuck really close to the design.


I mixed my alphas up for my title using different ones from the kits and altered the wood veneer letters using a black marker. 


I used lots of the rub-ons from My Mind's Eye around my page. They went on like butter and I love the dimension that they add to my page. 


I also added lot of chipboard elements from the Crate Paper Hello Love Collection to my page. I love how well they coordinated with all of the other embellishments that I used.


I haven't used a sketch in a really long time so it was fun to shake things up a bit. Thanks for stopping by and have a great day!

2.01.2016

February Kit Projects *Freckled Fawn*

Happy February everyone!

The beginning of the month means a new kit reveal for Freckled Fawn and I have my layouts that I created using the February kit, "Lovely", to share with you today.


For this layout,  I was really inspired by the bright colors of the acetate alphas and thought they would pair nicely with the cork numbers from the January Kit.


I used the only photos I had of my kids ringing in the new year and placed them vertically down the top right-hand side of my page. I layered one of the speech bubble stickers on top of one of the cork speech bubbles and hand-wrote my journaling on it.


I added the yellow glitter bow to the "2016" for an added pop of color and to make my layout feel a little more whimsical.


For this next layout, I used the bright alphas as my title and replaced the "o" in snow with an old FF chipboard snowflake.


I altered the snowflakes using some spray ink and scattered them around my page. I also used another cork speech bubble and coordinating sticker for my journaling.


I added several puffy hearts and plus signs from the February Kit and I just love how they add an extra color pop and dimensional layer to my layout.


Be sure a get your "Lovely" kit today before they're gone! Thanks for stopping by!