Happy Tuesday, my friends!
Today I have a tutorial for you on how to use modeling paste on a layout (or card, or anything else your creative little mind can come up with :)!
First, you'll want to gather up some supplies...
I used one of my favorite masks from SC, some card stock, washi tape, a plastic knife, a small paint brush, some of my favorite mists, and some modeling paste (the exact kind I used is pictured below).
Next, place your mask anywhere on your page that you would like. Adhere it down using some washi tape. The washi helps hold it in place and is easy to remove when your done.
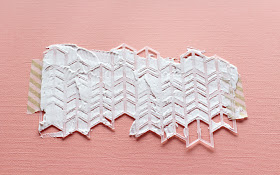
Now smear some of that paste over your mask using the knife until it's completely covered and your satisfied. (I should have used the side of the knife that wasn't serrated for a more even look and I'm sure there's a fancier tool for this, but I don't have it, lol!)
It should look somewhat like the photo below...
Now you can remove the mask and let the modeling paste dry. I was surprised at how fast it actually does dry so you won't have to wait too long, probably around 20 - 30 minutes :)
After the modeling paste dried, I took a small paint brush, dipped it in my Mister Huey's spray ink, and painted a few of the chevrons for added effect. I love the pops of color it gives the dimension of the paste!
Finally, after the paint dries, you can start assembling your page!
And here's the completed layout using the modeling paste technique...
I've scrapped this photo of my family before, but I don't mind doing it again :) It's a rare thing when we're all together in a photo, so it's totally justified!
I used products from my March kits from Studio Calico for this layout and a printable and stamp from LifeLovePaper.com
I hope this tutorial gets you breaking out the modeling paste and using it on your next project! It's a really fun medium to use and once you try it, I know you'll be hooked! I would also love to see what you create so be sure to link up your project using modeling paste here by April 2, 2013 for a chance to win some "happy mail" from me!
Have a great day and TFL!


Awesome tutorial! I am not so scared of modeling paste and may give it a try! Love how it turned out.
ReplyDeleteThanks, MK! It's really fun to play with :) xo
DeleteI love using this technique! Great layout!
ReplyDeleteThank you, Heather! I had a lot if fun with this one :) xo
ReplyDeleteLove how you used the mask, it turned out great! I like the texture the knife gave the modeling paste. If you were looking for an alternative tool to spread it out, those wooden craft sticks (that look like big popsicle sticks) work well :)
ReplyDeleteThanks, Michelle! I liked the texture the knife gave to when it was all said and done :) And I'll have to try out the wooden sticks, thank you!!! xo
DeleteGenius! What an awesome tutorial! Thanks for sharing...happy Tuesday! :) I adore that family photo, as well...use it as often as you wish. ;) :)
ReplyDeleteThank you so much, Nicole! xo
DeleteI love modeling paste. I love to use it on canvas for different effects. Awesome use on your page.
ReplyDeleteThank you, my dear! xo
DeleteThank you Adrienne for this tuto ! I love this technic, I didn't try so far but I have to get some modeling paste to try it now ! looks really good !
ReplyDeleteThanks, Natali! xo
DeleteGreat tutorial! I think I have to buy moedeling paste and give it a try!
ReplyDeleteThanks, Nina! Can't wait to see what you create! xo
DeleteAwesome tutorial! Makes me wanna get some paste right now! Is this similar to Gesso? I have some of that so was wondering if it gives the same effect. If not off to the crafts store I go..
ReplyDeleteThank you! It isn't the same as gesso...it's thicker and stiffer :) xo
DeleteGreat tutorial and awesome layout!! I like this effect modeling paste creates, I always used thick acrylic pait, but this is so much cooler!! :D Thanks your for sharing!!
ReplyDeleteThanks, Maria! xo
DeleteI just tried this on a page last week and I love it! I will have to try adding color with the mists...brilliant! Oh, could you tell me how you adhered your papers on top of the modeling paste? That was the hard part for me, lol! Thanks for your help!
ReplyDeleteThank you for your sweet comments, Sarah! I just used some glue dots to adhere my paper. They were by Elmer's and about 1/2 inch wide :) Hope this helps! xo
DeleteThank you so much for the inspiration, Adrienne!
ReplyDeleteYou're very welcome! xo
DeleteThis is fantastic Adrienne! I even have some modeling paste I bought last year. Time to break it out! :)
ReplyDeleteDefinitely! Thanks, my dear :) xo
DeleteThank you so much for sharing this...will be looking for paste at Michaels later today, great way to use my masks other than spray mists!!!
ReplyDeleteYou're very welcome! Have fun creating, Kirsten :) xo
Delete